|
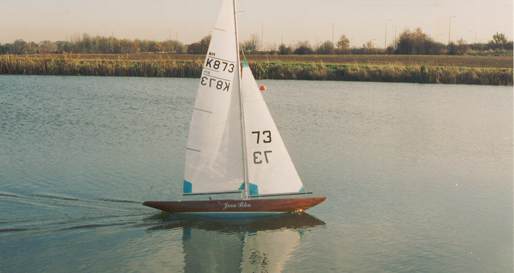
6M-Klasse, GB, Zedernbeplankung |
|
 |
|
 |
|
|
|
U R H E B E R S C H A F T Die 6-Meter-Klasse vereint in Großbritannien die Liebhaber von klassischen, sehr schönen RC-Yachten. Viele dieser Yachten werden aus Holz gebaut.
Die Klassenvorschriften obliegen der IMYRU, organisiert ist die Klasse in der MYA. Dabei hat die 6-Meter-Klasse einen eigenen Verband, die  Six Metre Owners Association. Six Metre Owners Association.
Auf der Homepage dieser Organisation gibt es viele Tipps zum Einstieg in diese Klasse, u.a. einen ausführlichen Baubericht einer 6M-Yacht. Hieraus ist der nun folgende Abschnitt über das Planken entnommen.
|
|
|
|
|
" I N T R O D U C T I O N T O P L A N K I N G " ( 6 M O W N E R S A S S . ) Originaltext auf der Homepage der Klassenvereinigung
"INTRODUCTION TO PLANKING, SECTION 2: Planking"
"With the backbone completed you are now ready to commence planking, which is the one area that worries people building a timber planked boat for the first time. By trial and error, on building various hull designs in this and other classes, a relatively easy and straightforward method has been found, which with reasonable care will enable the average modeller to complete a hull worthy of the class."
"First of all if you intend having a varnished hull. Or as the author prefers, varnished topsides, and a paint finish below the water-line, you will find colour matching the planks so that any colour differences occur gradually, will achieve a pleasing finish without much difficulty. Alternatively you may wish to try a striped effect with the planks varying to different degrees from the adjacent plank. This the author finds very unatractive in anything other than the small classes, and it will show any defects in your planking more readily, so be warned! Bill Daniels, the master designer, builder and skipper from yesteryear, stated. "The practice of planking in light and dark woods alternately is barbarous, and makes a yacht look like a mandoline." The L.W.L. marked on the sections will enable you to determine how many planks are required for the topsides, bearing in mind that the overhangs fore and aft require more planks to cover than the midship section. The method used for tapering the planks has now been proven for several hulls to different designs ie: Revival by Graham Bantock, Tern and Petrel designs by John Lewis. It is relatively quick and straightforward without the need to divide each section by the number of planks, (in this case 30 per side), or using a spilling plank which is the traditional method."
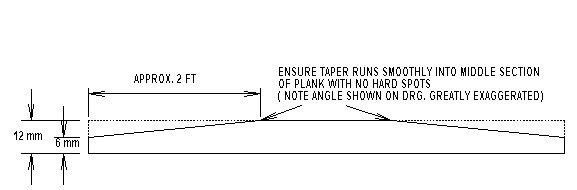
"Select your plank and cut this to length allowing approximately an inch extra. It is necessary, starting about two feet from each end, to taper the planking to half its width at each end. Using a pair of dividers set at 7mm in my case or at 6mm if your planking is 12mm wide, mark each plank ending, then using a 2 ft ruler or straight edge draw a pencil line as shown in Diagram 1. Using a sharp plane. The author uses a metal bodied Stanley No 3 smoothing plane. It has a 9.5 inch long sole, which does not suffer from any tendancy to follow any bumps or hollows in the saw cut edge of the plank. (Though some use a David razor plane). He also uses an old building board/plank on which he planes his planks. He does not trust his workbench to be flat. Plane the plank ends down to the pencil line ensuring a fair even curve results. This operation can be carried out for 4-6 planks at a time but do not be tempted to complete a larger quantity in one batch, as the planking will gradually become shorter as you progress, and once the excess length has been cut off they will of course not be the same width at the ends."
|
|
|
|
|
Diagram 1
"With experience this method can be modified as appropriate when the eye is more experienced. Although the use of a 'template/master' plank has been advocated, do not be drawn into thinking it is sacrosanct. It acts as a guide only. Each plank must be tailored for best fit, keeping an eye on the planking staying level where the ends must not either fall away or rise. Do not be tempted to fit your planks in any way other than in pairs, 1 port and 1 starboard. Failure to build in that way has the potential for the production of a distorted hull."
"There is no benefit in using planks which are too wide to lay flat on the shadow, there is a case to be made for wide planks topside midships, but only a few. Thereafter the turn of the bilge will dictate the width. Over use of wide planks, results in too much of the plank at the glue lines area being removed by sanding to obtain a fair hull with no flats. Thus a weak hull is produced which will not be very advantageous. Keep the planking straight, avoiding having to excessively pull it onto the one to which it is glued. This keeps the stresses to an absolute minimum and ensured the best possible 'lay'. Do not be tempted to make the bow and stern ends of the plank too wide. This is counter productive because, "A": it is almost impossible to get the ends to lay flat on the shadows. "B": it results in distortion and stress in the plank."
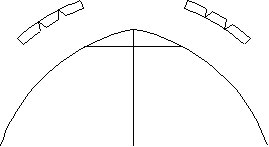
"Before fitting it to the jig it is necessary to bevel the lower edge of each plank to ensure it sits flat to the top edge of the plank below. This is not of course required on the first pair of planks to be fitted which is at the sheer-Iine, as a flat surface is required to which the deck will eventually be bonded, or as a matching surface to the deck if it is fitted inside the plank onto an inwhale. The author has tried to show in Diagram 2 the reason for this bevelling. Which looks harder than it in fact is, and after a few planks you will find it becomes a lot easier. Please be advised, that while the bevel towards the inner bottom edge of the plank is needed to avoid it 'grinning' at you. The bevel can easily be overdone. The result is, that that the joint 'grins' from the inside which does not provide the maximum possible area for the glued joint. This joint will weaken even more under the sanding operation. A little and often method, checking the fit along the length of the plank, is sound advice."
|
|
|
|
|
Diagram 2
"One point here worth mentioning is the selection of a suitable waterproof glue. The authors own choice has always swayed between Aerolite 306 and Cascamite. he is familiar with the properties of each and knows the weak points, the main one being that when dry they are fairly brittle which makes sanding down more difficult. The only real difference is Aerolite 306 uses a separate hardener, and the glue mix does not self harden. The big plus for both these glues is that they do have the ability to fill small gaps in glue lines, and whilst this is no excuse for poor planking it can be useful, especially if this is your first attempt. Follow the manufacturers instructions."
"The author has however recently heard of a one-metre hull, cedar planked , where the glue used is the white p.v.a. type available in a blue plastic dispenser of the water- resistant variety. This glue has the considerable advantage of ease of use, quick drying and easy to sand down but does not have any gap filling properties. Provided the hull is thoroughly coated in epoxy inside and out, this glue should be more than adequate with regards to its water resistance. Some builders advocate that they would not consider using cedar planking without an epoxy coating."
"When using epoxy as a coating ensure the type used will give adequate saturation of the timber. These are marketed by several manufacturers such as West Systems and SP Products. One final word of caution in using all epoxy based products, ensure you follow the manufacturers instructions for safe use and handling."
"Epoxy coating on the external and internal surfaces is however a matter for you own judgement. It will provide extra strength, but at the cost of extra weight. Internal and external coatings can add as much a 1 pound in weight to the hull. Good quality internal water proofing is simply obtained by a couple of coats of standard yacht varnish. If combined with glass tape it will provide local re-enforcing in areas of high load or stress. Use it as ribs in the shroud connecting area. At the foot of the mast. Around the root of the fin."
"After spreading your chosen glue along the top of the preceding plank, fit the next plank onto the jig using veneer pins (which are a finer gauge than the more common panel pins) into the shadows. If necessary, to achieve a good joint pull the plank down onto the one below using elastic bands or Sellotape, which will of course have to be removed before fitting the next plank. Be carefull here, because too much pressure pulling down on the plank will cause an indentation on its top, which can be detremental to the next glue line. As your planking skill grows with each new hull, your should be able to dispense with pinning the planks."
|
|
|
|
|
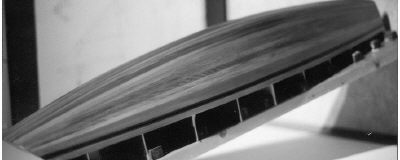
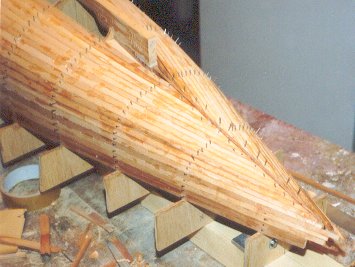
"As planking proceeds it is necessary to butt the planking onto the backbone at the stern, see photo C. The bow planking is merely trimmed off later ready to accept a capping piece, see details later."
Photo C
"Before completing the final few planks ensure that the slot has been cut out of the backbone to accept the fin, again see photo D."
Fortsetzung im Original der 6 Meter Owners Association: Inroduction to Planking: Section 3
|
|
|
 |
|
 |